HOW TO: wax your skis or snowboard
Pre-season, mid-season and even into spring skiing, waxing your skis is a regular task that will make your experience better. You can always drop them at your local ski shop for a light tune or, if you're a little more ambitious, you can do your own ski waxing at home. All you need are a few tools and some basic know-how.
While it can be a challenge to eke out the time for maintenance, a little wax job on the skis will do wonders for your planks; it'll make them last longer, you'll get better speed and your turns will be smooth, baby.
If you're new to waxing, here are some tips and videos to help you learn how to wax like a pro.
The set up: ski waxing tools you'll need
You'll need a dedicated space with room to move around, and space to lay out your planks. A work bench is ideal (you can buy specific ski tuning benches if you wish).
- wax: if this is your first time waxing, pick up a stick of all-purpose (all-weather) wax at your local ski shop or outdoor store.
- iron: Feel free to use an old iron at home, or buy a ski-tuning iron. Make sure there is no water in the reservoir – you want the iron to be very hot and dry – no steam!
- scraper tool (metal or plastic): Make sure to pick up a scraper from your local ski shops, the ones found at the shops will not damage the base of your skis or board.
- brush and cloth: a soft brush is important for wiping away wax shavings, and a damp cloth will remove dirt and dust from bases.
Now, wax on, wax off! Once you've set up your space and got your tools, it's time to get waxing.
score better snow days with SnowSeekers
sign up for the FREE newsletter that gets you into the snow
How to wax your skis or snowboard
Waxing is a three-step process: cleaning your bases, applying the wax and scraping off the excess.
Watch the videos below to see how it's done, and read on for some tips.
WATCH: how to wax your skis
WATCH: how to wax your snowboard
Step 1: prep and clean your bases
- Gently clean off the base of your skis or snowboard. Make sure to remove dirt, extra humidity, and dust before you wax. This will ensure you get the most coverage of fresh wax on your plank(s).
- For snowboards, you can remove your bindings so you have a stable surface to work with while applying the wax.
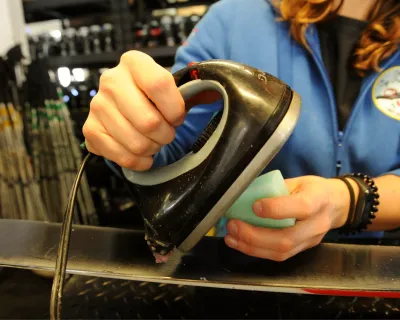
Step 2: apply the wax
- With your iron hot and wax in hand, start dripping wax around the outer edges, this is where your snowboard and skis base will be the driest.
- Move across the board or ski in a pattern to get an equal amount of wax over the base. Spread the wax across the base with the iron, until the entire base is covered. Make sure to keep the iron moving so that you prevent your base from getting too hot and potentially burning from the hot iron.
- Turn off your iron, and let the wax cool and absorb into the base for a half-hour to an hour.
Step 3: scrape off excess wax
- With your metal or plastic scraper begin scraping off any excess wax from your base. Make sure to scrape off any wax that may have been applied to your edges.
- After that, give your base a good brush to remove any particles, this will bring out the texture of your freshly waxed skis or snowboard and will make you go faster once you hit the slopes on opening day.
- Lastly, if you removed the bindings from your board, put your bindings back on and get ready to hit the slopes!
More ski tuning tips
Want to get even more technical? Read our breakdown on the entire ski tuning process, with tips, dos and don'ts and FAQs.

Photo:
Nick Nault
Get ready for 2023-24
We're amping up the stoke for the coming season. Check out more info on the snow season ahead, with opening dates, ski movie trailers and our annual forecast.